|
|
Post by Joe Botting on May 17, 2005 8:03:45 GMT -5
Hi All,
One of the most difficult things about illustration is getting good close-ups without the photomicroscope set-ups that I'm lucky enough to have available when back at the office. For field photography, or just taking pictures at home, one of the hardest things to get right is (for me) the lighting.
It should be controllable, and from a fixed direction to highlight the surface texture/relief, so that unfortunately rules out sunlight. Other than that, a desklamp light source tends to come out red, yellow, dim, or all three - it just doesn't have the wattage. Something like a torch has the brightness (and often is good white light), but because of the faceting and design of the torch, has problems with refractions and uneven lighting across the specimen.
What do you suggest for someone with a macro-lens camera but no specialist light sources? Or do we just need to bite the bullet and get a fibre-optic job from a microscope manufacturer? Please illuminate! (sorry, couldn't resist... :-)
thanks,
Joe
|
|
|
|
Post by hallucygenia on May 18, 2005 15:48:47 GMT -5
A couple of things I can think of. None of them may work, but they may be worth fiddling with.
The obvious thing is to think of using a non-standard bulb. Low-energy bulbs can be pretty bright - whether or not they'd be enough I don't know.
The other type of bulb that may be worth trying is a daylight imitating one - embroiderers sometimes use them, so they must be reasonably bright. As they imitate daylight, that might avoid any colour problems. I suspect this wouldn't work very well, so I wouldn't recommend going out to buy one specially. However, if anyone out there knows a friendly embroiderer who is willing to experiment...
When using a torch, might it be worth taking the glass plate off the front, and just having the bulb and the reflector? I don't know if that would improve the light quality. Another possibility might be to use a really big torch. If this worked reasonably, at least it would be potentially useful in the field, unlike any lamp that needs to be plugged in.
|
|
|
|
Post by Joe Botting on May 19, 2005 5:37:27 GMT -5
Hi Lucy,
thanks for the thoughts. I wondered about simply getting a torch with the glass removed as well, but I suspect that they're not as bright as they appear when you have just the bulb.... it's the glass that focuses it, I think, and introduces the problem. It's worth looking, though - you might be right that it's the reflector that does the job.
The daylight-imitation bulbs do sound good. Now all I need is an embroiderer and a very long lead! I've heard of them being used by gardeners as well, for growing things indoors, so this may well be worth looking into further. Will let you know!
thanks,
Joe
|
|
|
|
Post by Roy on May 19, 2005 13:14:16 GMT -5
Hi Joe and Lucy, Thinking about your DIY close-up problems, this is the way I would tackle it: First of all the requirement would vary considerably depending on whether you are using a digital or film camera. In digital photography the light temperature (affecting the bias towards yellow, red or blue colour cast) is controlled by setting the white balance. In most low-end of the market digicams these days this is simply a matter of a touch of a button to set indoor or out door exposure. In film cameras the issue is a little bit more involved. For example, the type and speed of film you choose will dramatically affect the results. It is possible to use colour filters to compensate for (eg. for tungsten lighting) various light sources, and a polarising filter will eliminate most reflection from the subject. The important word I picked up on in your post was 'controllable' and I think this is the key. When you are out there in the field in the cold, wet and windy Welsh hills the last thing you want to be doing is 'reinventing the wheel' every time you need to make a photographic record. So I would recommend establishing a system you know will work every time - in the comfort of your living room. Firstly the most important rule of macro photography is that the camera and the subject are absolutely still - movement is exaggerated when you are in close-up. Therefore, a small tripod is an essential item of kit (you can buy a very good desktop tripod quite cheaply from somewhere like http://www.7dayshop.com). Now, as for lighting I agree that daylight is not suitable in the field as a source of light as it is unpredictable in its intensity and temperature and we need to achieve consistently predictable results even when the light is failing towards dusk. A good powerful torch is not a bad idea and there are quite a number of rechargeable 'mile beam' torches on the market at reasonable prices. I would suggest building a simple rig to allow you to control the various factors affecting your photography. The rig you build will be largely the result of experimentation with the particular camera you are intending to use but should have the following features: 1. A rigid, firm support for the camera. 2. A camera with either a self timer or cable release exposure control. 3. A plinth or support for the specimen at a fixed distance from the focal plane of the camera. 4. A light proof black cloth to exclude ambient light ( always handy anyway if you have an LCD screen on your digital camera). Here is a simple sketch of the kind of thing I was thinking of: 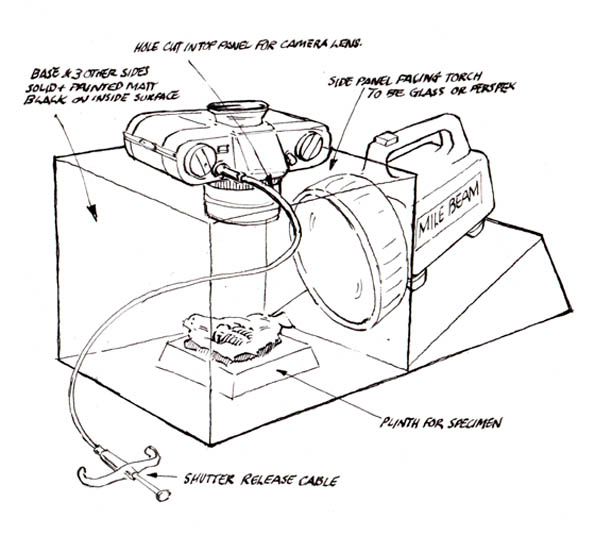 The transparent side of the box should be either glass or clear perspex over which you can put opaque sheets of tracing paper or 'spun' to diffuse the light from the torch and/or sheets of colour acetate (available from photography equipment shops) to compensate for colour temperature. The inside face of the box opposite the light source could also have white or mirror board placed against it to provide fill in lighting. Anyway, if anyone has any ideas to improve this arrangement please feel free to post them here and I'm sure that together we can work out an excellent system to make life easier out there in the field at those times when we are tired and cold and wet - and that has to be a good thing!. cheerio, Roy. Here are a couple of good examples of ac/dc lamps: www.vehicle-wiring-products.co.uk/VWPweb2000/worklamps/photo/NSENDUR.jpgwww.vehicle-wiring-products.co.uk/VWPweb2000/photos2/nspanthe.jpg |
|
|
|
Post by Joe Botting on May 20, 2005 6:58:57 GMT -5
Thanks for that wonderful set of suggestions, Roy!
I particularly like the idea of setting up a box rig that can accomodate all variations; it could potentially be used for everything down to millimetre size. Smaller than that isn't really a problem, since I probably won't see it in the field, anyway...
I will have to look into the use of coloured filters - do you know, off the top of your head, what colour would be necessary to counteract using a standard desk lamp as a light source? That could be useful to everyone, I suspect, as a momentary solution.
I'll have a good think about it, and see if I can come up with any modifications... and will certainly report back when I get around to trying it!
Cheers,
joe
|
|
|
|
Post by Roy on May 20, 2005 9:06:51 GMT -5
No problem - i hope it helps. I neglected to mention that the rig could easily be designed to fold flat using a velcro system to reassemble it. That way it would all pack very neatly into the rucksack without displacing too many luxuries!. Back in the days when I had my dear old Canon AT1, I used Cokin filters for colour correction and special effects. The tungsten light filter I used (which I was amazed to find earlier today lurking at the bottom of my kitchen drawer) was: Cokin COEF. +1 2/3 Blue (80B) A021 It really did produce very good results, of course it was also dependent on the speed and type of film used. I also noticed the price tag was still on the case it is in - it was £2.55 back in 1981!. There is a comprehensive source of info on the Cokin filter system and colour temperature charts here: www.geocities.com/cokinfiltersystem/www.geocities.com/cokinfiltersystem/color_corection.htmIt would be fun to build one of these 'palaeontological imaging rigs™" - who knows it might catch on.... ATB. Roy. |
|
|
|
Post by reighan on Jul 25, 2006 9:37:26 GMT -5
Hi, Roy
I'd said in the Intro section that my 100-watt craft ('daylight') bulb seemed to be working out well. I'd like to retract that statement based on the results of that bulb as it neared replacement and of the new bulb that gave different results from the first one.
Since my light source options are limited, I'm wondering whether it is acceptable to try to correct things once the image is on the computer. I can see that 'sharpen' misrepresents the matrix. Do brightness corrections and/or colour manipulations compromise accuracy of the image? If not, I'll learn how to use those adjustments...
Cheers,
Reighan
|
|
|
|
Post by Roy on Aug 25, 2006 10:30:25 GMT -5
Hi Reighan, Sorry I have taken a while to respond - things have been a bit hectic here in merrie old Cambridge in the last couple of weeks. To answer your questions about the various image correction options available (I am assuming you are using Photoshop), I would say it is all a matter of degree. Firstly, sharpen or unsharp mask can severely affect the detail in an image depending on the amount you apply. It is very useful if you are planning to print your images and can give hugely improved sharpness and impact to an image depending on the print medium. However, if (as we generally do here) you are only using the images for identification and study purposes, then there is really no better advice than to obtain the best lighting and exposure at the point you take the photograph or make the scan. Colour correction and brightness and contrast controls can enhance details in an image very well and as long as the colour is not over saturated (and therefore becomes blurred) and increased contrast does not burn out light areas of detail in the image, the detail will not be affected. As always though, make sure you make a back up copy to go back to and if necessary we can always try a few different filters at our end to try and enhance areas of particular interest in the image. You may find these tutorials useful - they contain a lot of detail about the technical aspects of image correction explained in a very accessible way: www.cambridgeincolour.com/tutorials/sharpness.htmwww.cambridgeincolour.com/tutorials.htmI'm off to Wales for a week now but I'll be looking in occasionally when I get near enough to civilisation to find an internet cafe!. toodle pip! Roy. |
|
|
|
Post by reighan on Aug 25, 2006 16:20:40 GMT -5
Hi, Roy
Thank you! I'll study those tutorials. I'm planning to take a beginner's photography course soon too. All of this would probably be a lot easier if I knew how to use the camera. ;D
Have a very nice journey!
Hwyl fawr,
Reighan
|
|
|
|
Post by Roy on Aug 25, 2006 18:25:19 GMT -5
Hi Reighan,
As far as I can see, your photography is excellent - the images you are posting have superb detail and it has been fascinating to see them and read the feedback from Joe and Lucy.
keep up the great work! - nos dda,
Roy.
|
|
|
|
Post by reighan on Aug 27, 2006 17:36:25 GMT -5
Hi, Roy Thank you for the encouragement. The photography has all been trial and error, which takes a lot more time than it would if I knew what I was doing.  The main problem is:  The other problem is that this room looks a little like that beach, except the room isn't pretty... ;D Thanks again, Reighan |
|


 The main problem is: